There’s something magical about gathering with loved ones on Memorial Day weekend, spreading a blanket under the sunshine, and enjoying delicious food together. As someone who’s hosted (and attended) countless outdoor gatherings, I’ve learned that the key to a stress-free picnic is planning ahead with dishes that travel well and taste even better as they sit.
This year, I’m sharing my favorite make-ahead picnic recipes that have become staples at our Memorial Day celebrations. These dishes are not only delicious but designed to withstand the journey from kitchen to park without wilting, spilling, or losing their flavor. Let’s dive in!
Why I Love Make-Ahead Picnic Recipes
Before I had my go-to picnic menu, I’d stress about last-minute preparations and worry about foods wilting in transit. One particularly memorable Memorial Day, I arrived at the park with a beautiful salad that had sadly turned soggy and sandwiches that had completely fallen apart. That’s when I decided to perfect the art of picnic-friendly food!
The recipes I’m sharing today can all be prepared the night before, which means on the day of your gathering, you can focus on enjoying the celebration rather than scrambling in the kitchen.
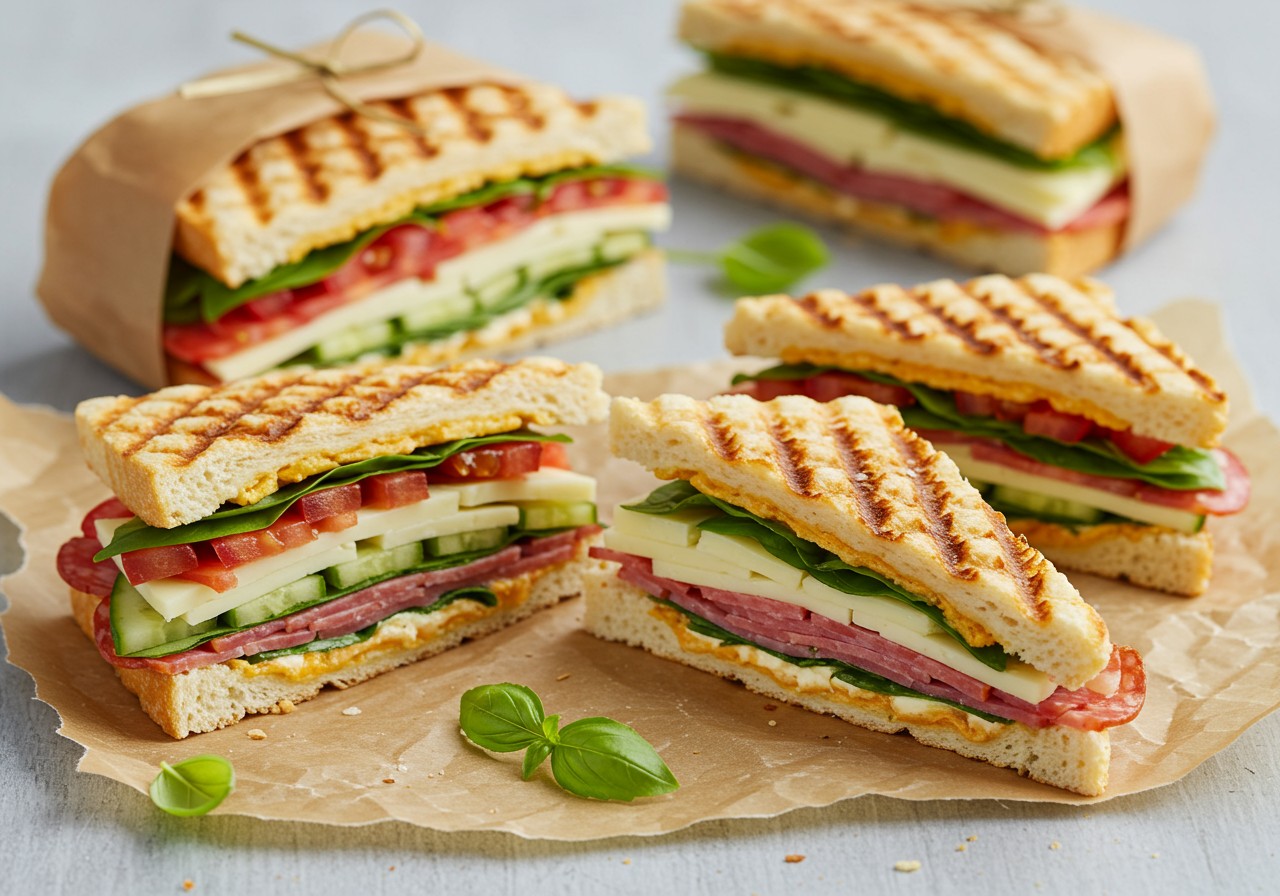
Recipe #1: Pressed Italian Picnic Sandwiches
These sandwiches are a game-changer for picnics because they actually improve with time! The pressing process allows all the flavors to meld together, creating an absolutely delightful sandwich that won’t fall apart when transported.
Ingredients:
- 1 large round loaf of Italian bread (or ciabatta)
- 1/4 cup olive oil, plus extra for drizzling
- 3 tablespoons balsamic vinegar
- 1 teaspoon Italian seasoning
- 1/4 pound thinly sliced provolone cheese
- 1/4 pound thinly sliced salami
- 1/4 pound thinly sliced ham
- 1/4 pound thinly sliced mozzarella
- 1 jar (12 oz) roasted red peppers, drained and patted dry
- 1/2 cup marinated artichoke hearts, drained and chopped
- 1/2 cup pitted olives, sliced
- 1 cup arugula or baby spinach
- Fresh basil leaves
Instructions:
- Cut the bread in half horizontally. Remove some of the soft inner bread from both halves to create a hollow for the fillings.
- Whisk together olive oil, balsamic vinegar, and Italian seasoning. Brush this mixture on the inside of both bread halves.
- Layer the ingredients in this order on the bottom half: provolone, salami, ham, mozzarella, roasted peppers, artichokes, olives, greens, and basil.
- Place the top half of bread over the fillings and wrap the sandwich tightly in plastic wrap.
- Place the sandwich on a baking sheet and top with another baking sheet. Add heavy cans or a cast-iron skillet on top to press it down.
- Refrigerate for at least 4 hours or overnight.
- Before packing for the picnic, unwrap the sandwich and cut into wedges. Rewrap tightly with foil or parchment paper.
Picnic Tip: I like to wrap each sandwich wedge individually so people can easily grab one without disturbing the others. This also keeps them from falling apart during transit!
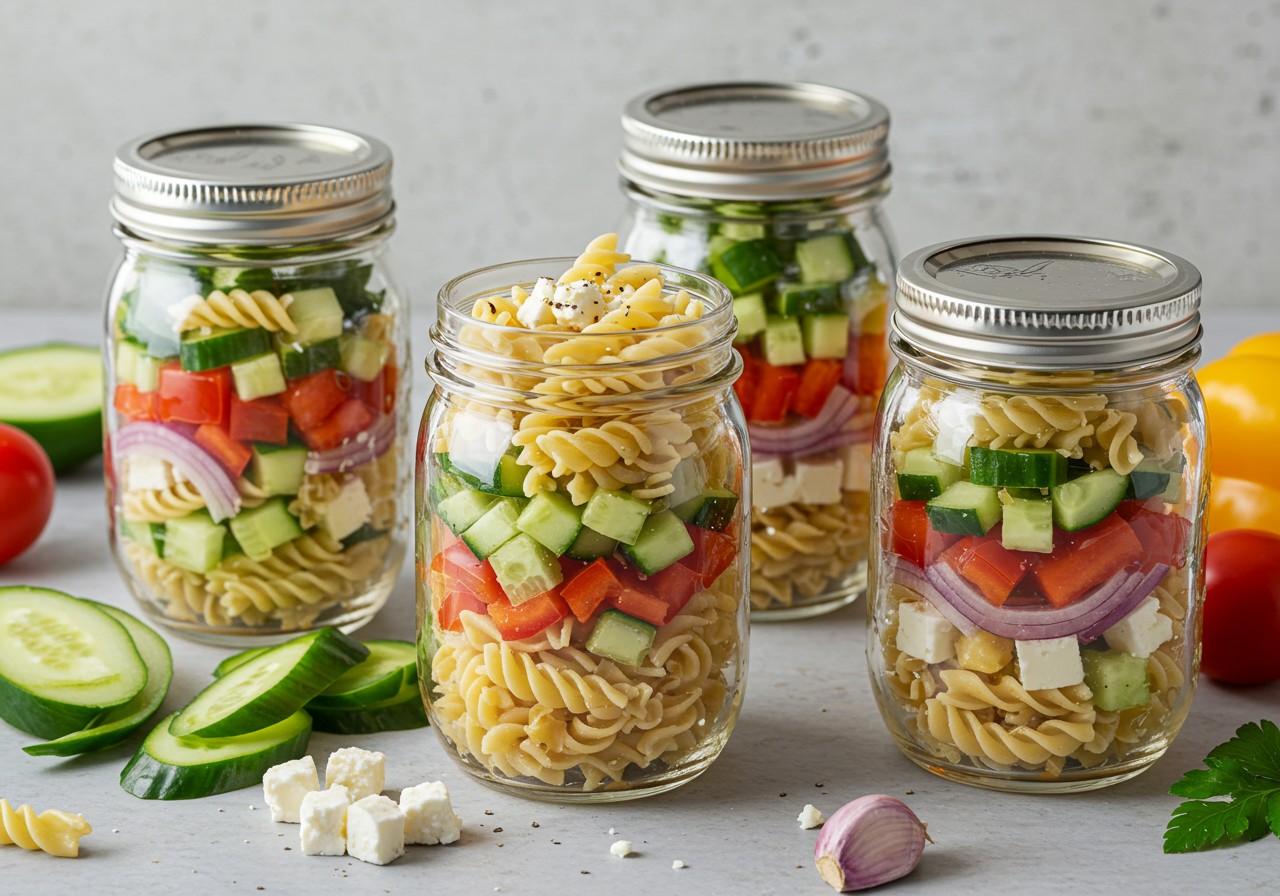
Recipe #2: Mason Jar Greek Pasta Salad
I love this recipe because it’s completely customizable, stays fresh for days, and looks absolutely gorgeous in glass jars. The vertical layering keeps ingredients separate until you’re ready to eat, preventing soggy salads.
Ingredients:
- 2 cups bow-tie pasta, cooked al dente and cooled
- 1/4 cup Greek dressing, plus extra for serving
- 1 cup cherry tomatoes, halved
- 1 cucumber, diced
- 1/2 red onion, finely diced
- 1 cup kalamata olives, pitted and halved
- 1 cup feta cheese, crumbled
- 1 cup chickpeas, drained and rinsed
- 1/4 cup fresh parsley, chopped
- 4 pint-sized mason jars with lids
Instructions:
- Toss the cooled pasta with 2 tablespoons of Greek dressing to prevent sticking.
- Layer ingredients in each mason jar in this order (from bottom to top):
- 2 tablespoons Greek dressing
- Cherry tomatoes
- Cucumber
- Red onion
- Pasta
- Chickpeas
- Olives
- Feta cheese
- Fresh parsley
- Seal jars tightly and refrigerate for up to 3 days.
- When ready to eat, shake the jar to distribute the dressing, or pour onto a plate.
Picnic Tip: Pack extra dressing in a small container for those who prefer a more dressed salad. I also bring a few extra jars for mixing and sharing!
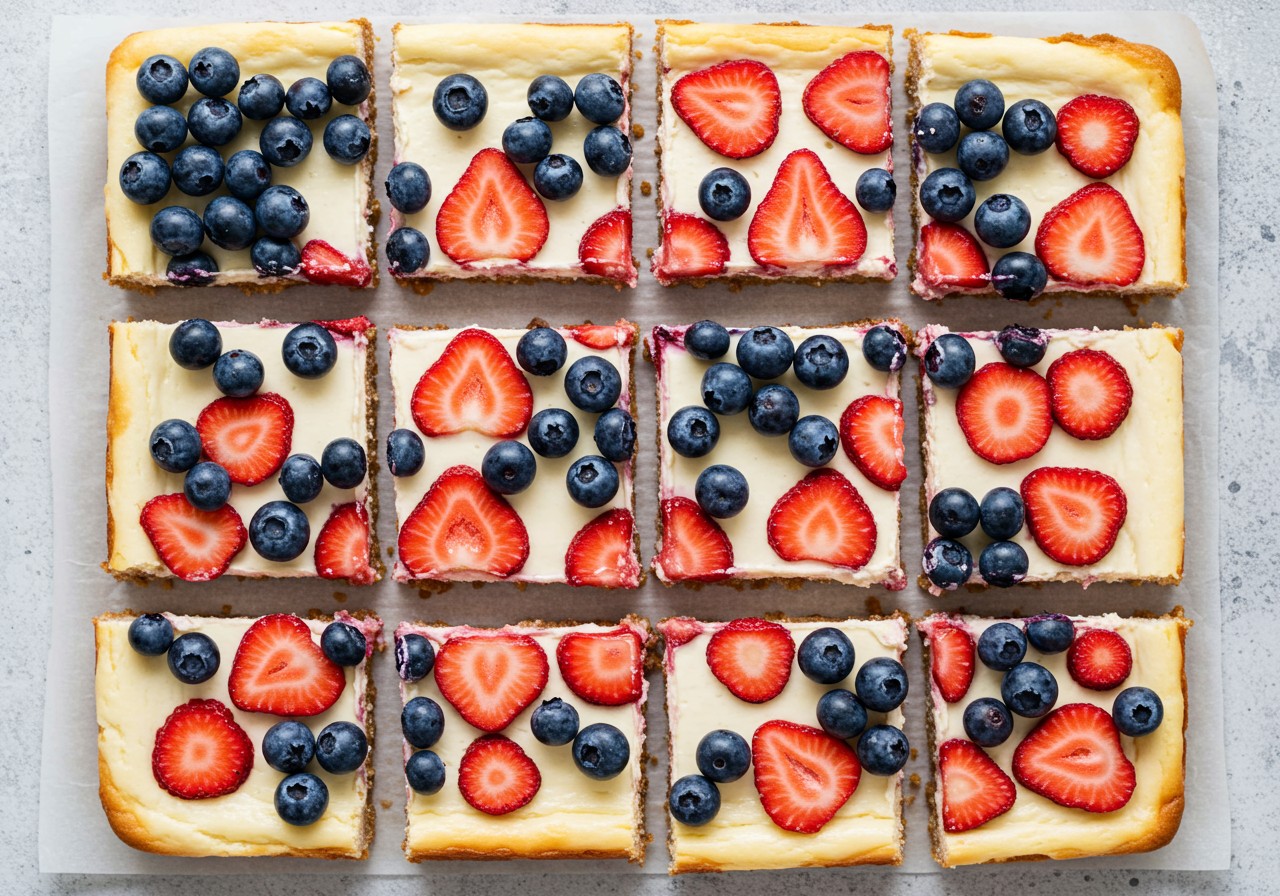
Recipe #3: Red, White & Blue Berry Cheesecake Bars
These patriotic treats are perfect for Memorial Day and so easy to transport! The buttery crust, creamy filling, and fresh berries make them irresistible. Plus, they can be cut into squares and packed in a container with parchment between layers.
Ingredients:
For the crust:
- 2 cups graham cracker crumbs
- 1/2 cup melted butter
- 1/4 cup granulated sugar
For the filling:
- 16 oz cream cheese, softened
- 2/3 cup granulated sugar
- 2 large eggs
- 1 teaspoon vanilla extract
- 1/4 cup sour cream
For the topping:
- 1 cup fresh blueberries
- 1 cup fresh strawberries, sliced
- 1/4 cup white chocolate chips, melted (optional)
Instructions:
- Preheat oven to 325°F. Line a 9×13 inch baking pan with parchment paper, leaving overhang on the sides.
- Mix graham cracker crumbs, melted butter, and sugar. Press firmly into the prepared pan. Bake for 10 minutes.
- Beat cream cheese and sugar until smooth. Add eggs one at a time, then vanilla and sour cream. Pour over the crust.
- Bake for 35-40 minutes until center is almost set. Cool completely, then refrigerate for at least 3 hours or overnight.
- Before serving, top with alternating rows of blueberries and strawberries to create a flag pattern. Drizzle with melted white chocolate if desired.
- Use the parchment overhang to lift out the entire dessert. Cut into squares.
Picnic Tip: I pack these in a flat container with parchment paper between layers. Keep them chilled in a cooler until ready to serve!
My Top Tips for Picnic Packing Success
Over the years, I’ve discovered some tricks that make outdoor dining much more enjoyable:
- Invest in good containers: Leakproof, stackable containers are worth every penny. I love glass containers for salads and desserts, but lightweight reusable plastic works well for sandwiches.
- Pack in layers: Place heavier, sturdier items at the bottom of your cooler or picnic basket, and delicate items on top.
- Temperature control: Freeze water bottles to use as ice packs—they’ll keep food cold and provide refreshing drinks as they thaw.
- Bring serving utensils: Don’t forget serving spoons, tongs, and a good knife for any last-minute cutting.
- Plan for clean-up: Pack wet wipes, paper towels, and garbage bags for easy clean-up.
- Think beyond food: Don’t forget sunscreen, bug spray, a portable Bluetooth speaker, and outdoor games!
Creating a Memorable Memorial Day Picnic
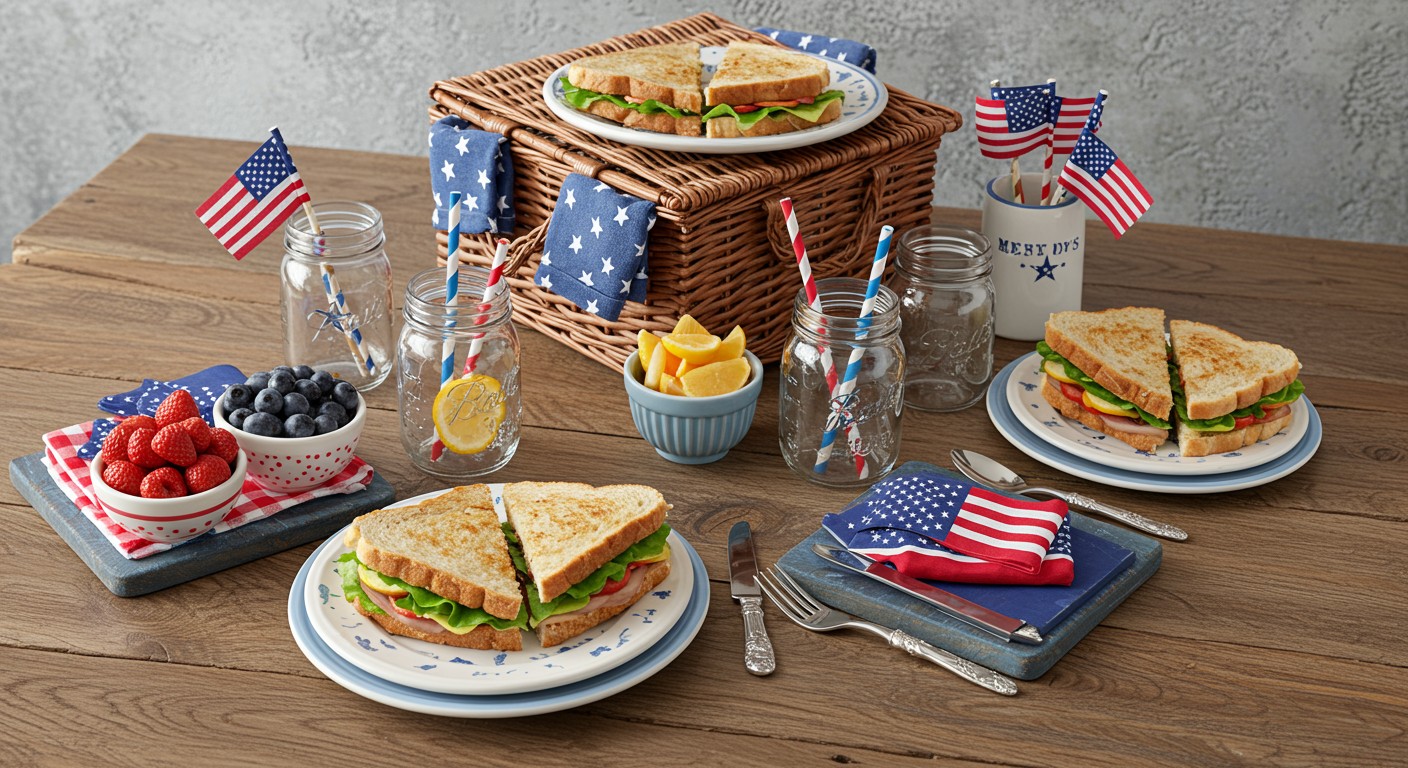
Memorial Day isn’t just about delicious food—it’s about honoring those who have served our country and spending quality time with loved ones. I like to incorporate small patriotic touches, like American flag toothpicks, red/white/blue napkins, or a meaningful toast to remember what the day is truly about.
Last year, my family started a new tradition of sharing stories about family members who served in the military while enjoying our picnic. It added such a special dimension to our gathering and helped us all connect with the true meaning of the holiday.
What are your favorite picnic recipes? Do you have any Memorial Day traditions? I’d love to hear about them in the comments below!
Looking for more seasonal recipes? Check out my Caprese Strudel Wreath or Pickle Margarita for more entertaining inspiration!
How far in advance can I make these recipes?
The pressed sandwiches and mason jar salads can be made up to 2 days ahead. The cheesecake bars can be made 3 days ahead (add the fruit topping the day of serving).
What’s the best way to keep food cold at a picnic?
Use a good quality cooler with plenty of ice or ice packs. Place foods in airtight containers and pack the cooler tightly to maintain temperature.
Can I make these recipes vegetarian?
Absolutely! For the sandwiches, replace the meats with grilled vegetables, extra cheese, or meat alternatives. The pasta salad is easily adaptable—just omit the feta for a vegan version or use plant-based feta alternatives.
What if I don’t have mason jars for the salad?
Any container with a tight-fitting lid will work! The layering technique works best in clear containers so you can see the beautiful ingredients.
How do I transport the cheesecake bars without ruining them?
Place them in a single layer in a flat container with a tight-fitting lid. If you need to stack them, place parchment paper between layers to prevent sticking.